If you are a starter to Git, you must have thought how you would create a Git repository and delve into the features Git provides to make your source code management efficient and flawless no matter what the size of your team is.
The answer is, you decide how you start. In this post, it's essential to introduce the three main workflows that guide you to start with creating your Git local and remote repositories.
After learning more about the workflows, you'll be able to decide which one that best suits your needs.
In this post, the three primary workflows of Git repositories creation will be explained by Git commands only using Git bash on Windows.
To create local Git repositories and know how to connect them to the remote ones you should know the following:
- Prerequisites to starting with Git repositories.
- The four stages of Git.
- The three workflows to create a Git repository.
- Create a new blank project with Git.
- How to add Git to an existing project source code.
- Joining an existing project on GitHub (Cloning a Git repository).
Prerequisites to starting with Git repositories
Before diving into Git, it's important to mention that you need to have Git bash command prompt adequately installed and configured on your Windows machine and it responds correctly to Git commands without errors and you have the necessary knowledge about bash commands.
Whether you installed Git bash or not, we recommend that you check the Easiest way to install Git bash commands on Windows and make sure you have all the right installations and configurations set.
The four stages of Git
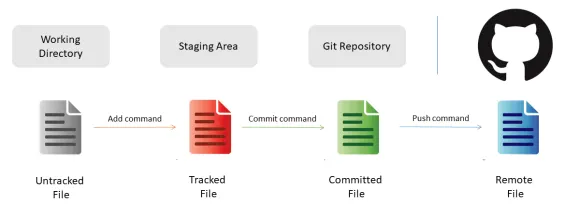
In this section, we found that it's crucial to start by introducing the necessary information about the four stages of Git in which will show how you can add a file to a Git repository and the steps it passes through.
Most of the online resources describe this as the three stages of Git, but we found that it's more appropriate to describe them as four stages. The following will explain why:
Stage 1: The working directory
The working directory is mainly the directory that holds all your project files on your computer. In this stage, changes may or may not be tracked and managed by Git.
Stage 2: The staging area
You can refer to this stage as "Git index", and it's as simple as an intermediate area that queues up your changes in one place for the next commit. Files in the staging area are tracked and managed by Git.
Stage 3: The Git repository (or the commit history)
In this step, Git creates the local repository and adds the ".git" folder in the project folder structure, and it contains the actual Git repository. Files that are committed in the staging area are moved to the Git repository and added to the commit history.
The above three stages represent your local Git repository. In other words, until step 3, no files have been uploaded to the remote repository at GitHub (or any separate remote repository) yet and here comes the fourth stage.
Stage 4: The remote repository
The fourth stage is the last step in a Git workflow, and it's basically where the code will be pushed (uploaded) to the remote repository on the internet. The remote repository has all the previous three stages internally.
The three workflows to create a Git repository
The three workflows of Git is the right place to get started. At any particular point in time you will match one of the following workflows:
- Create a blank project: You have not written any code or started your project yet, but you want to create a new empty project using Git.
- Add Git to an existing project: You are either in progress or finished your project, and you have some current source code locally on your file system that you want to add to a Git local and remote repository and continue your project using Git.
- Join an existing remote project: There is a current running project with source code on a remote repository on GitHub and you want to join this project by cloning (downloading) the source code to a local Git repository on your machine.
The following sections will explain each workflow in details and with Git bash commands.
Create a new blank project with Git
In this section, we'll explain the steps required to create a new project with Git.
Step 1: Browsing to the right path
- Create a new folder in your Windows file explorer. We will assume that the address to this folder is "C:\Projects\Git" where you will create your Git projects.
- Open Git bash and type in the following command to browse to the folder created
The double quotes are mandatory despite no spaces in the path. Now your Git bash should show the current path as shown in the screenshot below

Step 2: Create the new project using git init command
Let's assume the project name you want to create is "Kaizen". To create a new Git project with that name type in the following command
After running the previous command, Git bash should display a response like shown in the below screenshot

Now Git should show us that it stepped into the "kaizen" project folder and it's connected to the "master" branch as shown in the screenshot below

The master branch is your main default branch in Git where your last commit is. Now let's take a look at the files that Git created by default in the working directory:
ls means to list the files in that directory while -al means to show all files including the .dot files and folders like .git. The ls command is not a Git command it's rather just a bash command.

The .git folder presence means that Git successfully created our local repository and created the .git folder for us that holds all the necessary information for that repository including the commit history. We can also ask Git about the status of the created repository by running the following command:
By running this command, Git will respond as shown in the screenshot below:

Step 3: Staging and committing new files
At this level, the previously created Git repository is ready to add any brand-new file to the project. Let's add a minimal HTML page to the working directory "kaizen".
The minimal HTML page file is attached to this post in the attachments section at the bottom. You can download the minimal HTML file from the post attachments and put it in the working directory at the same level of the .git folder.

Now by running the git status command once more, we will find that Git is aware of an untracked file (the first stage) that you should stage to be committed in the future.

Run the following command to add this untracked file to the staging area:
then by rerunning git status, we find that Git has staged the file (the second stage).

At this step, the file has been staged and ready to be committed to the local Git repository (the third stage). The staged minimal.html file can be committed by running the following command:
-m means the commit message that will be saved in the commit history to describe what will be committed. If you figured out that you want to change the commit message after it has been committed then type in the following amend command:
Then you will be prompt to change the commit message, and when you finish editing the message you can quit by typing: :wq. Once you finish, quit the message editor. You can view history by typing in the following command:
The previous command will view your Git commit history with the following arguments:
- The
--graphargument will show a graphical look that will be more obvious with branching and merging. --allargument means show all information.- The
--onelinemeans show one commit per line.
The history will be displayed as shown in the following screenshot.

Step 4: Pushing the local commits to the remote repository on GitHub
At this step, we have our commits saved at the local Git repository. Now it's time to create a remote public repository at GitHub and push the changes to it. The steps needed to create a public repository at GitHub are straightforward:
- Go to https://github.com, log in with your credentials or create a new account then press the "New Repository" green button.
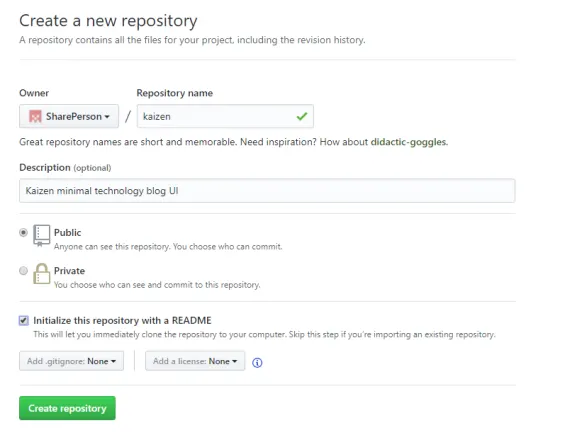
- The "New Repository" green button will open a new page on GitHub where you will be able to create a new repository. To create a public repository, make your form selection as shown in the following screenshot then press the "Create repository" green button.
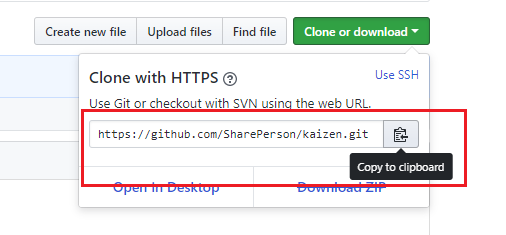
Now let's get back to Git bash on our local system and push the local commits in our history to the remote repository we have just created and copied its URL (the fourth stage). On Git bash, type in the following commands to connect your local repository to the remote one:
The first command will add an origin (a remote repository) to your local Git and the second one will verify the added repository URL. Next, it's time to check and pull all the changes on the remote repository to the local one to get them both aligned. Now merge both local and remote histories by running the following command:
The previous command will get the latest commit history on GitHub and merge it with the latest local commit history on your local Git repository with the following arguments:
originmeans your remote repository.mastermeans your latest local commit in the local Git repository.--allow-unrelated-historiesis to force merging the remote history with the local one to get both histories aligned and ready for pushing the local commits to the remote repository.--allow-unrelated-historiesis used only in the first pull attempt.
Git will prompt for your GitHub credentials then it will show a response that looks like the following screenshot.

It's always recommended to follow the best practice to pull the remote changes/commits first before pushing yours. If you are working with a team, then your local repository is most likely not updated with the latest remote changes.
The last step is pushing the local commits in the local Git repository to the remote one on GitHub by applying the following push command:
Which will result in a response that looks like the following screenshot:

You can also view the commit history now to have a visual look for what happened so far on Git by typing in the following Git log command:
Git will show a history visual response that should look like the following screenshot.

At this step, you have a fully working Git local repository that's connected to a remote one, and you will only need to pull remote commits and push your local ones on any subsequent changes.
How to add Git to an existing project source code
Connecting Git to an existing source code is very similar to what we described before as initiating a new project from scratch with Git.
The differences are that to add a project with multiple source code files you would need a different Git add command from the previous one that adds only a single file.
To setup a demo project we added a zip file to the post attachments section so you can download and unzip to a new local directory called "kaizen".
If you created this directory in the previous section, then you should delete it to start fresh with this new approach.
After you finish unzipping the file to your local directory that's called "kaizen" let's browse to this directory using Git bash assuming that the working directory "kaizen" is placed in the "C:\projects\git" path. On Git bash type in the following command:
Once Git's default path is changed to that directory, let's initiate a git project by running the following command:
Notice that there are no arguments beside the init command which is different from the first git init command that we ran before that had a project name as an argument.
Git should respond that it created a new empty repository and you should be able to see that it's currently set to the "master" branch as shown in the previous screenshots.
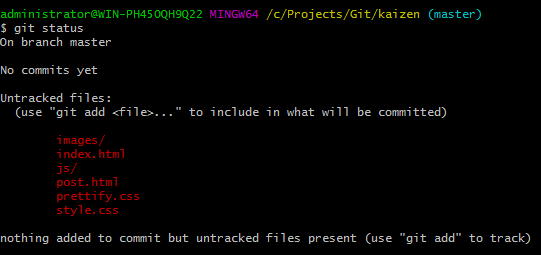
Now if we ran the git status command we would find that all the contents of the "kaizen" working directory are untracked as shown in the following screenshot.
At this step we should add all those untracked files to the staging area by running the following command:
Note the . (dot) argument that means that Git should add all files and folders recursively rather than adding single files.
Once you run the previous command, follow the following steps to commit your changes to the local Git repository then push it to the remote one on GitHub as shown in details in the previous workflow:
- Type in the
git statuscommand as shown before to check if all files and folders have been added successfully. - Type in the
git commitwith-margument to commit your changes to the local Git repository as shown before. - As shown before, go to GitHub to create a new repository if you don't have a remote repository on GitHub yet.
- Connect the local Git repository with the remote one using the
git add origincommand. - Before you push your changes to the remote repository, it's always recommended to do a
git pullwith forcing a merge to the unrelated histories as shown before. - In the final step, type in the
git push origin mastercommand to push your local commits to the remote repository on GitHub.
At this step, it's useful to add some commands to the process. To undo the added files to the staging area, you can run the following commands:
At any point of time you can also run the following Git command to view all tracked files by Git:
Joining an existing project on GitHub (Cloning a Git repository)
In this workflow, you joined a new team, and you are given a GitHub remote repository and asked to join the project placed in this repository.
This workflow is also very similar to the previous ones except that you will need to clone the remote repository to your local system as the first step then after cloning the remote repository successfully, you will do the same as described before to add, pull, push or remove files.
To clone a remote repository, go to where the remote repository is on GitHub and copy the GitHub repository URL as shown before in the first workflow in this post.
We will assume that the remote repository is our "Kaizen" demo project that we have been working on in this post for the demo purposes. To clone this repository, type in the following Git command:
Git will create the project folder by default by running the above command.
After cloning the remote repository to a local one, you will be able to add, edit or remove files, track them by adding them to the staging area, committing them to the local Git repository and finally pushing them to the remote one on GitHub.
Read Next
The following articles are related to 3 ways to create git local and remote repositories.




Thanks for this. Saved my hair!
I need to set up a remote git server on an internal windows network server. I don't see how to use github for that purpose and the various git remote commands cause a file locking error.