In this post, renaming, changing and removing a Git branch will be explained in details by commands on Git Bash.
It is important that you read every section carefully and check the other posts linked in the introduction section in case more information is needed on separate topics on Git.
Introduction to managing your Git branches
In almost every organization that's running small to large-size projects under a source control, like Git, the need to branch out specific updates, or commits, is inevitable.
Keeping your commits on a separate branch makes it reliable for the other team members to push hot fixes to the master branch version without worrying about your updates or any conflicts that they will cause when the final merge happens.
Dealing with branches, developers tend to need some common tasks like changing the name of the current branch (or another branch), move from one branch to another when they are in the middle of a task, and they need to hop into another one before they push the current branch, also deleting branches is needed on a daily basis.
That's why we gathered all those simple operations in one post to make them easier for developers to do them with a solid reference.
The following sections explain how to rename, change or remove Git branches using Git bash commands and some other IDEs:
Prerequisites
This post assumes that you have a considerable knowledge of the following:
How to rename a Git branch
Common scenarios renaming Git branches are:
- Renaming the current branch.
- Renaming a separate branch other than the current one.
- Renaming a remote branch.
Renaming the current branch
Assuming that you are required to change the name of the current branch in your project, then run the following command:
The following screenshot is a running example of the previous command changing the branch name from "branch1" to "branch2"

Renaming a different branch
Assuming that you want to rename another branch other than the current one in your project, then run the following command:
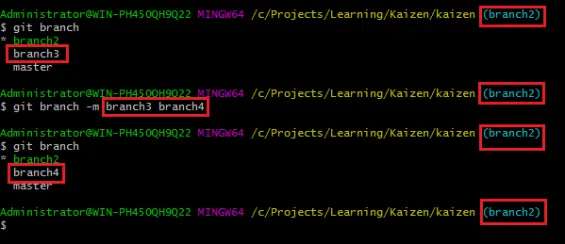
In the next example screenshot, "branch3" is renamed to "branch4" while the current branch is "branch2"
Renaming a remote branch
Assuming that you want to rename a branch that exists on the remote repository (for example GitHub), then you need to run the following command:
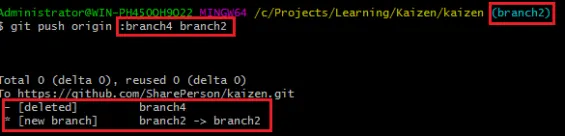
The following screenshot shows that running the previous command could replace the remote branch "branch4" by the local branch "branch2" which means this operation is actually replacing branches rather than renaming.
How to change the current Git branch
This is a simple scenario where you only need to move from the current branch to another one.
Assuming that you are currently at branch "branch2" and you want to move to another existing local branch "branch4", then running the following command will achieve this:

If you want to move to another new branch that does not exist yet and you want to create it, then this can be done in two ways, the long way and the short way.
The long way will simply create the branch in a step and move to that created branch in another step as follows:
The previous command will create a new branch called "branch5". Then moving to that branch will be as simple as:
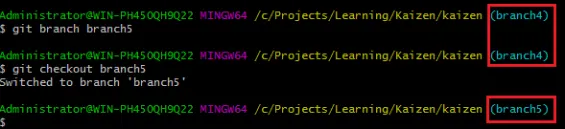
However, the following shorthand command can do the previous two steps in only one, as follows:
That will create a new branch called "branch5" and move to it in one step.
Switching between branches on Visual studio
If you do not use Visual Studio as an IDE then you may need to skip this section.
Visual Studio 2017 provides a useful integration with Git where you can easily switch between branches with only one click.
On Visual Studio, please follow the next steps to change your current branch:
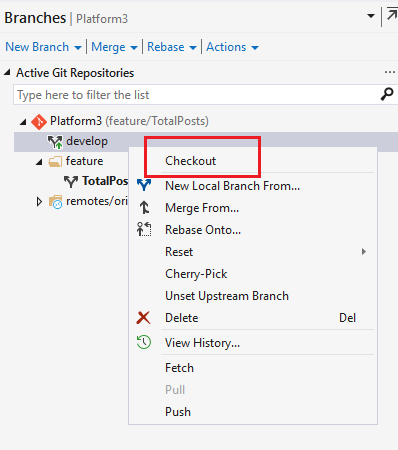
- Open Team Explorer window.
- Click Branches.
- Right-click the branch you want to switch to and click "Checkout" as shown in the next screenshot.
How to delete Git branches
This scenario contains two obvious use cases, which are removing a local Git branch and deleting a remote one.
Deleting a local branch
To delete a local branch, make sure that this branch is not currently checked out.
Git will not allow you to delete a checked out branch which makes sense.
To delete a Git branch, run the following command:
In the previous command, the local branch "branch5" will be deleted.
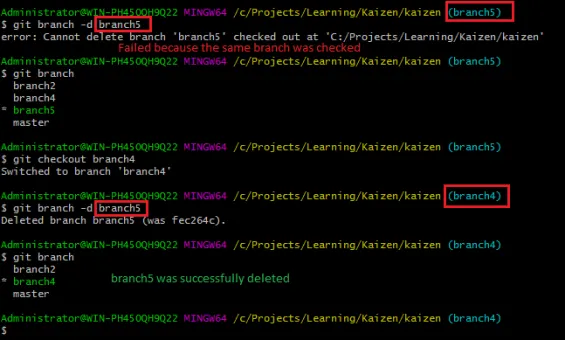
The following screenshot shows 2 attempts of deleting a local branch.
A failed attempt where the same checked out branch was being deleted, and a succeeded attempt where a different branch (branch4) was checked out while we were trying to delete "branch5".
Deleting a remote branch
Removing a remote branch is straightforward, simply run the following command:
The previous command will delete the remote branch "branch4". You can also delete remote Git branches directly on GitHub as shown in the following screenshot:

Summary: Managing Git branches
Managing your Git branches by renaming, changing or deleting them is extremely easy and straightforward using any tool including Git bash commands.
As shown in this post, any operation can be done running only one command and the commands are self-explanatory.
Read Next
The following articles are related to common ways to rename, change or remove git branches.