This post is structured as follows.
- A Working React Native Application Code is Attached to this Post
- First Approach - Using React Native ImageBackground
- Second Approach - Using a Custom Background Image Component
- Why the custom approach since React Native provides ImageBackground already?
- Attachments
Approach One: Using React Native ImageBackground right from the react-native library and pass the desired styling and source image.
Approach Two: Building a custom Background image component which will act flawlessly as a full width background image using a React Native Image and View. This approach turns out to provide a reusable component that can be consumed using only the desired properties that achieve the goal.
A Working React Native Application Code is Attached to this Post
Before we start digging into the React Native world building background image, it’s important to mention that a fully working React Native project code is attached to this post. Scroll down to the bottom of this post until you reach the “Attachments” section, and feel free to download the project code and run it.
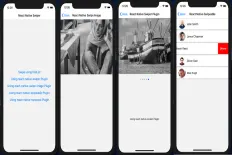
The running app should look exactly like the following snapshot:

The screen on the left is the custom background image approach, while the one on the right is the ImageBackground from React Native.
To successfully run the app, you should navigate to the root directory with your terminal first then type in the command yarn install to install all node modules dependencies, then finally run react-native run-ios to launch the app on your iPhone simulator.
First Approach - Using React Native ImageBackground
In this approach, It’s fairly easy to import the ImageBackground from react-native library and consume it, passing the target background image.

Code is attached to this post in the attachments section
- The source property requires a source to your background image placed in your assets' folder in your app.
- It’s required to pass the width and height to the style property, otherwise the image will not show on your app.
- You can also pass opacity to the style property.
Second Approach - Using a Custom Background Image Component
In this approach, we will build a custom reusable component that works as a background image, and you can call this custom component anywhere in your app.

Code is attached to this post in the attachments section
The above code is extremely easy creating a custom background image component that allow you to pass the background image source, any child components and an opacity.
You can modify this component to add any additional custom properties that suit your app requirements.
- Using flex: Basically, this component relies on setting a View container to flex to 1 which will expand it to fill the app screen and also setting the Image’s flex to 1 to expand and fill the containing view’s width and height.
- Positioning: Another key factor that let the image act as a background literally, is positioning it as absolute with z-index as 0 with width and height set to 100% implicitly. You won’t need to pass that in to the consuming component, which will make your code looking better.
- The
StyleSheetFactoryclass: this class is created to allow passing the opacity as an external property that will be passed by the consuming component. - Passing Child Components: To allow the consuming component to embed other components into the background image, this.props.children is added.
Finally, to consume this custom component, your code should look like the following:

Notice that no styling is needed in this case, since all the needed styles are enclosed inside the custom component. Also, Two components, Text and Button, are embedded inside it without any problems.
Why the custom approach since React Native provides ImageBackground already?
This post provides two different alternatives with two different coding styles because, in some cases, you would find it useful to use a custom background component rather than using the out-of-the-box ImageBackground provided by React Native.
There is no right or wrong when it comes to architecting an application. It always depends on your desired coding mindset, and it’s always better to have different options in mind to achieve a certain goal.
Attachments
You can download the full application React Native project code here.
Read Next
The following articles are related to two easy ways to add react native background image.