The following topics will be discussed in this post.
- Interactive Running Demo
- Step 1: Setting up required Select2 CSS and JS CDN files
- Step 2: Putting the required HTML in place
- Step 3: Configuring the AJAX Select2 dropdown list with JavaScript
- Recap
In this post, we will build a full example of an Ajax dropdown list using Select2 JavaScript CDN files.
The dropdown list loads its data by Ajax from a REST API, then displays the returned data in the dropdown menu.
The Select2 dropdown will have the following features:
- Load an initial list of users returned from a REST API.
- Search through those users and display the filtered data.
- Allows multiple selections and displays the selected users.
This example using only HTML, JavaScript, and CSS end to end. The REST API used is already live and open for anonymous access to anyone.
Thanks to GO Rest for maintaining such an awesome live fake users API. No programming language experience is required to understand this example.
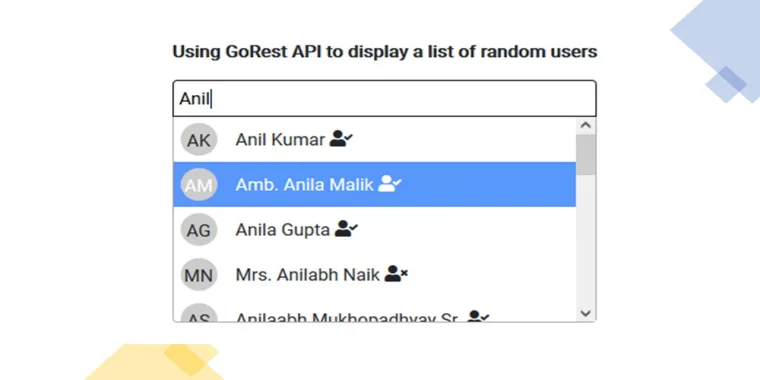
Interactive Running Demo
You will get a result similar to the below working demo. Feel free to try it and interact with it yourself.Step 1: Setting up required Select2 CSS and JS CDN files
In this example, only Bootstrap 4 and Select2 CSS libraries are required.
To set up the required CDN CSS files, put the following references in the HTML <head> tag of your page.
Bootstrap 4 CSS CDN on JSDelivr:
<link rel="stylesheet" href="https://cdn.jsdelivr.net/npm/bootstrap@4.6.0/dist/css/bootstrap.min.css" integrity="sha384-B0vP5xmATw1+K9KRQjQERJvTumQW0nPEzvF6L/Z6nronJ3oUOFUFpCjEUQouq2+l" crossorigin="anonymous">Select2 CSS CDN on JSDelivr:
<link rel="stylesheet" href="https://cdn.jsdelivr.net/npm/select2@4.1.0-beta.1/dist/css/select2.min.css"
Now, we only need jQuery, Popper, Bootstrap 4 and Select2 JS libraries to run this example.
To set up the required CDN JS files, put the following reference at the bottom of your HTML tag of your page.
jQuery CDN JS file:
<script src="https://code.jquery.com/jquery-3.3.1.min.js" integrity="sha256-FgpCb/KJQlLNfOu91ta32o/NMZxltwRo8QtmkMRdAu8=" crossorigin="anonymous"></script>Popper CDN JS file on JSDelivr:
<script src="https://cdn.jsdelivr.net/npm/popper.js@1.16.1/dist/umd/popper.min.js" integrity="sha384-9/reFTGAW83EW2RDu2S0VKaIzap3H66lZH81PoYlFhbGU+6BZp6G7niu735Sk7lN" crossorigin="anonymous"></script>Bootstrap 4 CDN JS file on JSDelivr:
<script src="https://cdn.jsdelivr.net/npm/bootstrap@4.6.0/dist/js/bootstrap.min.js" integrity="sha384-+YQ4JLhjyBLPDQt//I+STsc9iw4uQqACwlvpslubQzn4u2UU2UFM80nGisd026JF" crossorigin="anonymous"></script>Select2 CDN JS file on JSDelivr:
<script type="text/javascript" src="https://cdn.jsdelivr.net/npm/select2@4.1.0-beta.1/dist/js/select2.min.js"></script>Once you place the required CSS and JS CDN references, you are ready to start building your nice Select2 dynamic dropdown list with Ajax.
Step 2: Putting the required HTML in place
Your HTML code required to run this example should be as simple as the following:<select id="UserList" name="UserList" multiple=""></select>
The “multiple” attribute is needed here to let Select2 know that this is going to be a dropdown list that allows multiple selection.
Step 3: Configuring the AJAX Select2 dropdown list with JavaScript
In this example, we are going to configure the Select2 dropdown list to call a fake random user public REST API at: https://gorest.co.in/public/v1/users.A GET request to that API will return a response in the following JSON format:

Now, at the bottom of your HTML tag, add a <script> tag as follows:
Notice the following important configurations:
- delay: This is a rate limit duration in milliseconds that will let the dropdown wait after the user finishes typing until the next Ajax request is sent.
- data: This is a JavaScript function that is used to send some parameters to the requested API in a JSON object format. In this case the dropdown will send 2 parameters to the API, name, and page.
- name: is used to pass whatever term the user types in the dropdown to search for users.
- page: is used to pass the next page number to the API as long as the user is scrolling through the items in the dropdown list and the API has more data to return.
- processResults: It is a JavaScript function that is used to identify which data in the returned response represents the pagination and which represents list items. In this case we only need the total number of items from the response, which is found at meta.pagination.total.
- more: used to tell the dropdown if there are more items left in the API to return or not.
- templateResult: This is the JavaScript function responsible for rendering the UI of each list item in the dropdown menu. In this example, this function was used to render each user’s initials, full name and the status icon (active or inactive based on the returned data from the API).

Recap
In this example, we could easily build a fully functioning Ajax Select2 dropdown list with CDN CSS and JS files.We also attached a fully working HTML page in the next attachments' section that you can download, run, and see the code for yourself.
If you have any questions, or feedback, feel free to leave me a comment in the comments section and I will answer as soon as possible.
Read Next
The following articles are related to select2 cdn js complete ajax example in 3 simple steps.