

Deleting source code files without a source control management system leads to irreversible data loss. This post will provide 4 different ways to remove files from git history.
Here comes the necessity of a version control system (e.g. Git) that you can use to delete files, undo changes to specific data, or remove entire sets of code changes from history (delete a commit from Git).
In this post, we'll dig deep with wiping out files using Git bash commands from either staging (tracked data), commit history, or the remote repository on Windows environment.
Before we start, it's essential that you determine what you are trying to accomplish with your removal operation before you run any commands.
Is your file in working directory only and not tracked yet by Git? If Git monitors your file, Is it in the staging area or commit history? Is it already in the remote repository?
These are all questions that you should ask yourself before starting the actual deletion of files.
To remove files or directories from commit history or back out changes from a single file, you can go through the following sections:
- Prerequisites to using Git Bash on Windows to delete files.
- Preparing a demo project for testing Git bash deletion.
- Remove a file from Git commit history.
- Deleting an entire directory from Git commit history.
- Removing a file from the remote repository (GitHub).
- Undo changes in the staging area and local repository.
- Revert an entire Git commit in history by commit ID - (add deleted files - remove added files)
- Summary.
Prerequisites to using Git Bash on Windows to delete files
In this post, we will assume that you have Git bash installed on Windows that runs commands correctly.
However, we recommend that you take a look at the Easiest Way to Install Git Bash Commands on Windows and make sure you applied all the necessary configurations before getting started with the demo that follows.
We also assume that you have the required Git knowledge of repositories and how to clone a remote one to your local system. If not, you can take a look at the 3 Ways to Create Git Local and Remote Repositories.
Preparing a demo project for testing Git bash deletion
In this section, you will prepare a demo project to test the different Git removal and backing out commands on some of its files.
You can skip this part if you'd like to run the deletion commands on your project, but we recommend it to avoid any unexpected risks. To set up the demo project, follow these steps:
Step 1: Open Git bash on your windows machine.
Step 2: Browse to your projects path - we assume it's "C:\Projects\Git". Create that directory with the same path then run the following command on Git Bash:
With the double quotes as shown in the command.
Step 3: Clone the demo project called "Kaizen" from GitHub by running the following command:
Then once Git finishes the cloning, browse to the project Git working directory by running the following command:
Git should now show you that it stepped into the project working directory and the current branch is (master).
Step 4: Now, let's ask Git about the status of the pulled repository by running this command:
Git should now show that it's in a clean working directory as shown in the below screenshot:

Now you should be all set for testing the different scenarios of deleting files from history with Git commands.
Remove a file from Git commit history
In this section, we will delete a file from the pulled local Git repository and push the deletion to the remote repository.
In the "Kaizen" project let's remove the "minimal.html" file from the repository and go from there until we push the deletion to the master origin.
Step 1: To delete the "minimal.html" file, run the following Git command:
then by running the git status command, you should find that Git has deleted the file and staged the deletion to be committed as shown in the next screenshot.

Step 2: Now, it's time to commit the staged deletion to the local repository with the following command:
Then by rerunning the git status command, you should get a response from Git that you are in a clean working directory and you got nothing more to commit.
At this step, Git deleted the file on the local repository only, but if you went to the remote repository on GitHub, you'd find that the file still exists there.
That is because the deletion commit is not pushed to the remote repository yet.
Step 4: To push the committed deletion to the remote repository, run the following command:
After running the previous push command, the file should no more be existing in GitHub and Git should show a response like the one in the following screenshot:

By running the previous four steps, you should have the file removed entirely from Git commit history and the remote repository.
Deleting an entire directory from Git commit history
Deleting a directory/folder in Git is similar to deleting a file. Let's assume that you want to remove the "level1" directory under the "Kaizen" project.
To eliminate that directory, run the following Git command:
If you followed the previous command by a git status command, you'd find that Git staged the directory deletion and the files beneath it to be committed.
At this step, you can run the git commit command followed by the push command to push the removal up to the remote repository in GitHub as shown in deleting a file in the previous section.
Removing a file from the remote repository (GitHub)
You can delete files directly from GitHub by going to the repository page, click the file to remove, then on the file page click the delete icon as shown in the following screenshot:

Once you click the delete icon, GitHub will send you to the next step where you will be prompted to enter a commit message, and an optional commit description then click the "Commit Changes" green button to commit your changes.
Once the changes are committed, it's time that you align your local repository with the changes that happened on the remote one - which is the file deletion. To align your local repository, you will need to run the following Git pull command:
Once you pulled all the changes successfully, you can check your local repository's file structure, and you will find that the last pull removed the file.
Undo changes in the staging area and local repository
This section shows how you can back out your changes to a file after staging or committing it to the history.
To demonstrate this, you are going to add a couple of changes to a single file, one of them will be committed while the other one will be staged, then you will undo both with commands.
Let's assume you are going to do these changes to the "hipster.txt" file found in the root directory.
Step 1 - Editing the file: To edit this file from Git bash, type in the following command:
The above command will run successfully assuming that you configured notepad as the default file editor in your Git bash installation.
Otherwise, you can edit the file manually using any other external editor. Now let's add some text to that file then close notepad.
Step 2 - Add the change to the staging area then committing it: As previously shown, you can stage your changes by running the following command:
Then commit your changes by running the following command:
Step 3 - Adding the second change and staging it: As shown in step 2, repeat the same procedure by editing the file, adding your second amendment to the staging area, but this time, do not commit your changes.
Step 4 - Checking Git status and viewing the history: Now let's make sure that the previous three procedures are done correctly by running a git status command followed by a git log to see the history of changes in the local repository.
To do this, type in the following commands:
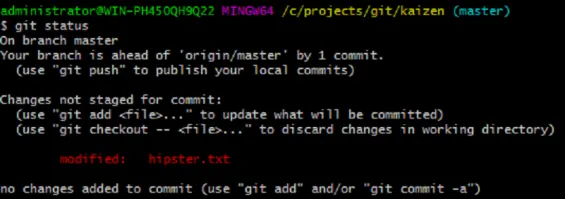
In this case, Git will show you that the second change is found in the staging area while the first modification is in the commit history of the local repository as shown in the screenshot below:

Step 5 - Backing out the changes in the staging area: In this step, we will execute the Git bash command that backs out the second change done to "hipster.txt" and added to the staging area.
To undo the staged change, run the following command:
By running the previous command, Git will unstage the second change done to "hipster.txt" and move it to the working directory as an untracked change.
If you run git status you will get a result like the following screenshot:
To get rid of that change entirely from the working directory, run the following command:
Now, if you followed the above command by a git status, you should find that you are in a clean working directory without any changes in the staging area.
At this point, you have successfully deleted the modifications done to the file "hipster.txt" and saved in the staging area.
Step 6: Backing out the changes in the commit history (local repository): At this stage, let's undo the first change done to "hipster.txt" and committed to the local repository. To do this, run the following command:
The previous command will back out the changes that are committed and entirely removed that commit from the history but, as shown in the last step, Git will just unstage that change, but it's still there in the working directory as an untracked change.
To completely wipe out that change, rerun the git checkout command in step 5. Now, if you run git log command again to view the history, you'd find that the latest change committed is removed which means you have successfully removed your file changes from both tracking and the commit history.
Revert an entire Git commit in history by commit ID - (add deleted files)
Let's assume that you discovered a bug somewhere in the code and you found that the bug exists in one of the commits in the history and the only way to resolve this is to remove the entire commit but this time, the commit is not the last one (head) in your local repository.
In this section, you will remove a whole commit by commit ID.
If the commit you're about to revert has some files deleted, then Git will add the deleted files back and vice versa.
The first step is to run the git log command (mentioned before) to check the commit IDs in the history then copy the target commit ID you want to delete and run the following command:
Assuming that the commit ID you want to delete is 089148c.
At this step, Git will prompt you to enter a commit message for the reverted change then after you finish writing your message, click the escape button on your keyboard then type in :wq to exit the revert message screen.
You will also notice that Git will add a new commit that will actually revert the original commit mentioned earlier.
To reflect your revert to the remote repository, you can simply push your changes with the following command:
Summary: Removing files and backing out changes from tracking and commit history
In this post, we introduced how important a source control is to any software development company and how to decide what you are trying to delete or undo and if they are single files, directories or entire commits.
Then we prepared a demo project to start removing files from and began to erase individual files by Git then directories then ran commands to back out changes in the staging area and the commit history.
Then we introduced how to revert a commit from history by ID. If you have any questions, feel free to leave a comment.
Read Next
The following articles are related to 4 ways to remove files from git commit history.


Very useful article, Thanks for sharing this
delete files from local repo(curent working directory) by using git rm command git rm file1 file2 file3 file4.................. 2. commit your changes to github git commit -m "files deleting" 3. push your changes git push