
The following topics will be discussed in this post.
- Before we start: Are you new to Kendo MVC wrappers?
- Step 1: Create a new ASP.NET Web Application
- Step 2: Project file structure and references
- Step 3: Kendo MVC grid with an upload column
- Step 5: The upload and remove asynchronous actions
- Step 6: Save the uploaded file
In the previous post about Kendo Grid Dropdown Column in MVC - 10 code snippets and screen shots I have illustrated how you can integrate Kendo drop down lists inside Kendo grids using MVC Razor Wrappers.
In this post I will provide a slightly different example.
In this step-by-step guide I will try to simplify the steps to place a Kendo upload control inside a Kendo grid using the MVC Razor wrappers.
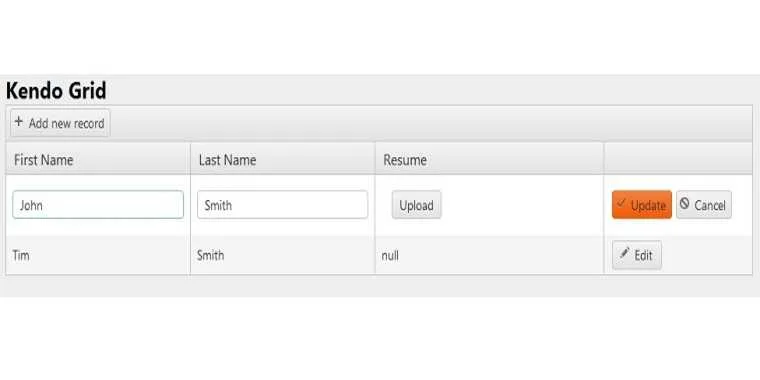
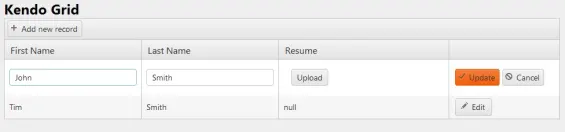
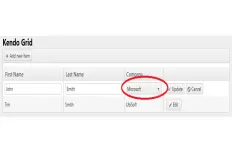
The final output would look similar to the below screen shot. The technologies used are ASP.NET MVC in the C# language, JQuery and the Kendo UI MVC Razor wrappers.
So this post would assume that you have a good background in these technologies. Follow the following steps to get your job done easily, efficiently and in a short time.
At the time of this post I used the following versions:
- Visual Studio 2015
- ASP.NET MVC 5.0
- Kendo UI 2015 Q1
- JQuery 1.9.1
For more information about these technologies please go to the following links:

Before we start: Are you new to Kendo MVC wrappers?
If you are new to Kendo MVC wrappers in general, then I got you covered. Here's a nice YouTube video that will give you a great heads up introduction about using Kendo grids in MVC and binding the grid to a data source with CRUD operations using Entity Framework.
It's a complete example that will get you on track with this post achieving the final goal which is integrating a Kendo upload into the grid.
I encourage you to watch
Step 1: Create a new ASP.NET Web Application
Open your visual studio and create a new ASP.NET Web Application as shown below

Finish the steps to create a new ASP.NET MVC internet application.
Step 2: Project file structure and references
It's important to have the Javascript and CSS files of Kendo and JQuery placed in your layout file in the following manner
<p><link href="@Url.Content("~/Content/kendo/2015Q1/kendo.common.min.css")" type="text/css" /> </p><p><link href="@Url.Content("~/Content/kendo/2015Q1/kendo.default.min.css")" type="text/css" /> </p><p><script src="@Url.Content("~/Scripts/kendo/2015Q1/jquery.min.js")"></script> </p><p><script src="@Url.Content("~/Scripts/kendo/2015Q1/kendo.all.min.js")"></script> </p><p><script src="@Url.Content("~/Scripts/kendo/2015Q1/kendo.aspnetmvc.min.js")"></script> </p><p><script src="@Url.Content("~/Scripts/kendo.modernizr.custom.js")"></script> </p>Step 3: Kendo MVC grid with an upload column
This section would kick off the Kendo grid with the first step to integrate a Kendo upload in its inline editing mode. The following Kendo grid is built up with a list of employees objects of type Employee .
The Employee class will be as the following code snippet.
Notice both properties ResumeFileUrl and Filename as those are the properties which will preserve the uploaded file information which is in this case a resume' file.
The following snippet shows how to build up a Kendo grid with a Kendo file upload control
and the below code snippet shows the JavaScript error callback needed for the above Kendo grid
<pre class="prettyprint linenums"> <p><script type="text/javascript"> </p><p>function error_handler(e) { </p><p>if (e.errors) { </p><p>var message = "Errors:\n"; </p><p>$.each(e.errors, function (key, value) { </p><p>if ('errors' in value) { </p><p>$.each(value.errors, function() { </p><p>message += this + "\n"; </p><p>}); </p><p>} </p><p>}); </p><p>alert(message); </p><p>} </p><p>} </p><p></script> </p></pre>The most important part in the Kendo grid snippet is the Kendo file upload column integration through an EditorTemplate and how it's done in Kendo which is the following line
<p>columns.Bound(e => e.ResumeFileUrl).EditorTemplateName("ResumeFileUrl").Title("Resume").ClientTemplate("#:Filename#"); </p>The EditorTemplateName should be exactly like the string model property ResumeFileUrl and the column title is "Resume" and in the end we need to render the file name not the file path, that's why the ClientTemplate("#:Filename#") is used.
The EditorTemplate here would be another view under EditorTemplates folder with the same name as "ResumeFileUrl". So the next step would be creating that view.
Step 4: EditorTemplate view for the upload control
Now within the same views folder of the current view, create a new folder called "EditorTemplates" and add a new view to it as shown in the below screen shot.

and your folder structure should be exactly like the following screen shot.

The next code snippet shows the MVC Razor for the Kendo upload control that should be in ResumeFileUrl.cshtml
<p>@model string </p><p>@(Html.Kendo().Upload() </p><p>.Name("ResumeFileUrl") </p><p>.Events(events => </p><p>{ </p><p> events.Select("onSelectResumeFile"); </p><p> events.Success("onUploadSuccessResumeFile"); </p><p>}) </p><p>.Messages(messages => </p><p> { </p><p> messages.Select("Upload"); </p><p> }) </p><p>.Async(async => </p><p> { </p><p> async.Save("SaveResumeFile", "Home"); </p><p> async.Remove("DeleteResumeFile", "Home"); </p><p> async.AutoUpload(true); </p><p> }) </p><p>.Multiple(false)) </p>Notice that the control name must be exactly like the model property name which is "ResumeFileUrl". We have added a couple of events which is the Select and the Success and they should be self descriptive.
We have also added a couple of asynchronous actions which are the Save and the Remove which will be triggered upon saving and removing the file respectively. The control is set to auto upload the file without any confirmation and finally it's configured to upload only single file at a time.
The next code snippet shows the JavaScript callbacks needed for the above Kendo MVC upload control.
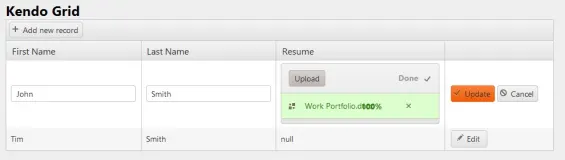
<p>function onSelectResumeFile(e) { </p><p> $.each(e.files, function (index, value) { </p><p> var allowedExtensions = ".doc|.docx|.pdf"; </p><p> if (allowedExtensions.indexOf(value.extension.toLowerCase()) < 0) { </p><p> alert('This file is not allowed. Check file type.'); </p><p> e.preventDefault(); </p><p> } </p><p> }); </p><p> } </p><p> function onUploadSuccessResumeFile(e) { </p><p> switch (e.response.Type.toString().toLowerCase()) { </p><p> case "upload":paint </p><p> alert('Your resume file has been uploaded successfully.'); </p><p> break; </p><p> case "remove": </p><p> alert('Your resume file has been removed successfully.'); </p><p> break; </p><p> } </p><p> } </p>The first callback will be triggered once the user selects a file and would not allow irrelevant file types. Only doc, docx and PDF files are allowed since the upload control's purpose is to upload a resume file.
The second callback will be triggered once the upload file is either uploaded or removed successfully based on the e.response.Type which will be illustrated later in this post.
Note: Both callbacks above should be placed under the grid's error callback not in the ResumeFileUrl.cshtml.
Step 5: The upload and remove asynchronous actions
At this step, we would add a couple of asynchronous actions to the controller. The first action will temporarily save the file into a session, when you click upload and it's successful, until the user decides to click update on the Kendo grid to save his data.
The second action will remove the file if the user decides to cancel his uploaded file. Add the following actions to the controller in your MVC project.
<p>public JsonResult SaveResumeFile() </p><p> { </p><p> string filename = String.Empty; </p><p> const string sessionKey = "RESUMEFILE"; </p><p> if (HttpContext.Request.Files != null && HttpContext.Request.Files.Count > 0 && HttpContext.Session != null) </p><p> { </p><p> List<HttpPostedFileBase> files = HttpContext.Session[sessionKey] as List<HttpPostedFileBase>; </p><p> foreach (string fileName in HttpContext.Request.Files) </p><p> { </p><p> HttpPostedFileBase newFile = HttpContext.Request.Files[fileName]; </p><p> if (files == null) </p><p> { </p><p> files = new List<HttpPostedFileBase> {newFile}; </p><p> } </p><p> else </p><p> { </p><p> files.Add(newFile); </p><p> } </p><p> HttpContext.Session[sessionKey] = files; </p><p> if(newFile != null) </p><p> filename = Path.GetFileName(newFile.FileName); </p><p> } </p><p> } </p><p> return Json(new { Type = "Upload", FileName = filename }, JsonRequestBehavior.AllowGet); </p><p> } </p><p> public JsonResult DeleteResumeFile(string fileName) </p><p> { </p><p> const string sessionKey = "RESUMEFILE"; </p><p> List<HttpPostedFile> files = HttpContext.Session?[sessionKey] as List<HttpPostedFile>; </p><p> if (files != null && files.Count > 0) </p><p> { </p><p> //Don't rely on browser always doing the correct thing </p><p> files = files.Where(f => Path.GetFileName(f.FileName) != fileName).ToList(); </p><p> HttpContext.Session[sessionKey] = files; </p><p> } </p><p> return Json(new { Type = "Upload", FileName = fileName }, JsonRequestBehavior.AllowGet); </p><p> } </p>Since we are uploading a file temporarily in a Kendo grid, the decision of saving that file will not take place until the user hit the update button of the grid which means the uploaded file should be saved temporarily until that decision is made by the user. This is what the first action does.
The first action SaveResumeFile save the file in a session in the current HttpContext the object saved in that session is of type List<HttpPostedFileBase> to support for multi-file upload but in this case only one file would be saved in that list.
The second action DeleteResumeFile is the opposite of the first, which means it deletes the temporarily saved file in SaveResumeFile if the user, for example, found that he uploaded the incorrect file and he just wants to undo his upload.
This second action get the list of files saved in SaveResumeFile, searches for the target file by file name, delete it and save the list back to the session.
Step 6: Save the uploaded file
The previous step (Step 5: The upload and remove asynchronous actions) made it so easy on the Kendo grid to just read the list of files (only 1 file in this case) from the list saved in the session in step 5 then save those files through file.SaveAs("filePath"); and do the necessary database updates like saving the permanent file path.
Now all what's needed is that you create the Kendo grid update action which is UpdateEmployees and do your necessary actions to the temporarily saved list of files and don't forget to empty the session at the end of the operation.
Hope this helps!
Read Next
The following articles are related to kendo file upload inside kendo grid mvc in 6 steps.


Hello Fady, the button "Update" is not showing on the "Resume" column. It only shows the file names. How do I fix this? Thank you.
HOW CAN I USE SAME FOR POPUP EDIT MODE?
columns.Bound(e => e.ResumeFileUrl).EditorTemplateName("ResumeFileUrl").Title("Resume").ClientTemplate("#:Filename#"); where my code isn't working due to ClientTemplate("#:Filename#") In the above line, the controller isn't returning the name of the file and ResumeFileUrl and Filename are always showing null.
This line isn't working columns.Bound(e => e.ResumeFileUrl).EditorTemplateName("ResumeFileUrl").Title("Resume").ClientTemplate("#:Filename#"); where my code isn't working due to ClientTemplate("#:Filename#")
Thanks, but if I have several rows in the grid, how do I sort out which row uploaded which file?
You can get the row index by getting an instance of the grid "var grid = $("#PEPGrid").data("kendoGrid");" then get the selected row "var selectedRow = grid.select();" then get the row index "var index = selectedRow.index();" but, by following the session approach I believe you will not need to know the row index since the update button will always save the files saved in the temporary session. It's not that clean with memory footprint but it works.
How do you know which row the upload was for? SaveResumeFile() doesn't seem to know which Employee the uploaded file is for.
It temporarily saves the list of files in a session until the "Update" button is clicked. On update, the action pulls those files from the session, empty it, then save them to disk and/or database.