Building an application on a limited-space mobile device screen is challenging. When using a list, a React Native Swiper is always a significant component that preserves space on a mobile screen using a swiping technique. Other components can be hidden below the swipeable area like a delete button or any other action.
Swipers consistently yield to a better mobile user experience since the user will be able to view more data in a limited space and, at the same time, perform actions only when required.
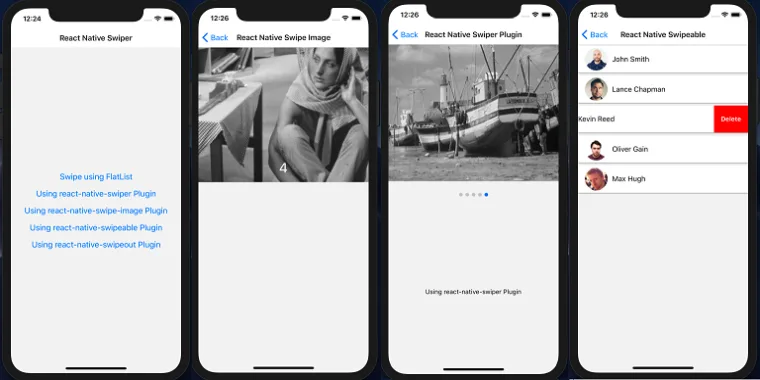
In this post, we are going to focus on adding a React Native swipe functionality to images and view components through five different ways:
- We are going to work with the React Native Swipeable plugin with swipe to delete (a view) functionality.
- We are going to test the React Native Swipeout (React Native Swipe List View) plugin.
- React Native Swipe using a FlatList without any plugins.
- Also, we are going to use the React Native Swiper plugin.
- Finally, we are going to apply the React Native Swipe Image plugin.
We are going to build an example for each plugin and also discuss its advantages and disadvantages in detail.

It’s also worthy to note that you can find the source code of the demo we are going to go through on GitHub here.
Please be noted that the demo uses React Native version 0.61.5, and that is going to impact some React Native swiper plugins that we’re going to use, but we are coming to that later.
If your React Native project has a lower version, you can check The easiest way to upgrade React Native to version 0.60.5 or above for a detailed walkthrough on the upgrade process and how to fix the possible issues. This post also includes how to create a brand-new React Native app without using Expo.
Preparing Dummy Data and APIs
In the scope of this post and testing different React Native swiper plugins, we are going to prepare some dummy data to populate our swipeable lists. These dummy data are in the form of two JSON files.
One JSON file carries out some dummy images, as shown below:
And the other file contains a list of persons as follows:
Then call them out using an API class as shown below:
Of course, in a real project, the above method would be replaced by live REST services or other data sources.
Integrating the React Native Swipeable plugin
The next exciting plugin is react-native-swipeable. The swipeable plugin can only swipe one child component, which means the app is going to render as many swipeable components as required on your screen and every one of them swipes the component underneath.
That will freely give us the ability to add some standard functionality like the swipe to delete, but you have to rely on your styling skills to render that appropriately, as shown below.

To render a list like the one shown in the screenshot above, you should have your code close to this:
Notice that the swipeable plugin expects two properties:
rightButtons:which is an array of components, as shown in the code snippet below. The reason behind the array type is, it allows placing multiple components on swipe. However, in this demo, we just needed a delete button, and that’s why it returns only a single-element array.rightButtonWidth:which is a number that represents how far you need your component to swipe to the right.
Here’s the code snippet that renders that right buttons:
The React Native Swipeable plugin also allows you to place left buttons with left button width using the leftButtons and leftButtonWidth properties, respectively.
The plugin swipes from both sides, but we needed only the right side in the scope of this post.
Finally, as shown in the previous code snippet, you can easily handle the “delete” operation when a user clicks the delete button. For example, here’s how to delete a person from the list immutably and save it back to the local state:
Note: If your React Native version is 0.60 or higher, then using this plugin will, again, show warnings that some lifecycle hooks likecomponentWillMount, componentWillReceiveProps or componentWillUpdate are obsolete. Testing the React Native Swipeout Plugin
If you open the react-native-swipeout documentation, they mentioned that it’s no longer supported, and the best and more efficient alternative to the previous plugin is the react-native-swipe-list-view plugin.
This plugin expects a list of objects through the data property, then gives you the freedom to render your items through the renderItem, renderItemWidth and rightOpenValue properties.

The great deal using this plugin is, it’s compatible with React Native version 0.60 or higher. It doesn’t show any warnings, unlike the previous plugin.
Your code should look like the following snippet to use the React Native swipe list view plugin:
It’s that simple. However, it uses a different technique revealing the hidden components on swipe. It uses the renderHiddenItem to give you the ability to render a complete hidden row under the swipeable component.
Then you can use styling to either show the hidden component - the delete button in this case - on the left or the right, as shown in the below code snippet:
Then styling the delete button as follows:alignSelf: ‘flex-end’ style that throws the delete button far on the right. React Native Swipe using a FlatList
In this section, we are going to build a custom React Native Swiper without any plugins. We are going only to use the FlatList component, configure it to work as a swiper, then finally apply some styling to it.
Here’s an example of what we are going to build. If you clone the demo’s Git repository on your local machine and run the application, you get a similar result to the below screenshot.

First, you need to import the FlatList from the react-native library, then configure your FlatList, as shown in the code snippet below:
FlatList component requires the following properties to display a swipeable horizontal image list, as shown in the previous screenshot: horizontal: This property will displays theFlatListin a horizontal direction instead of the vertical default one.pagingEnabled: Allowing paging is required side by side with the horizontal.keyExtractor: You should pass a unique key for every item to this property. A key could be your item ID or any type of a unique identifier. Just note that it must be a string value.showHorizontalScrollIndicator: You must turn off this feature (set the property to false) so that theFlatListdoes not display any kind of horizontal scroll bars while you scroll your items.
One crucial caveat using a FlatList here is that the width of the FlatList must be equal to the screen width only. That is important for the FlatList to be able to force displaying one item only on the screen while swiping.
As the FlatList grows with more list items, it takes more width, and it is undoubtedly going to pass the screen width leading to an undesirable behavior showing the edge of two items on the screen once the scrolling stops.
You can find a similar issue reported on this StackOverflow question.
Here’s an example of what we are trying to avoid. Without limiting the FlatList width to the mobile device screen width, the FlatList could stop scrolling at something like this:

To limit the width of the
FlatList to the mobile device screen width, we used the Dimensions component from the react-native library, as shown in the below snippet: As you notice, the local state controls the width in the
componentDidMount lifecycle hook; then, the local state width variable can be passed to the FlatList width using the style property. We recommend that you carefully check this example to put it all together, building the swiping FlatList with all the above configurations covered.
Using React Native Swiper Plugin
The next approach to swipe components is using the react-native-swiper plugin. This plugin is straightforward to implement and understand.
You need to list the group of components that you would need them to be swipeable between the
<Swiper> plugin opening and closing tags, as shown in the snippet below: There’s nothing more needed to swipe components more than that. Notice that the swiper plugin also adds some navigational buttons below your swipeable components.
Note: By the time of this writing, if you’re using React Native version 0.60 or above, you will get a warning on the screen that is close to the below screenshot:

That warning means that the plugin uses either componentWillUpdate or componentWillReceiveProps which are deprecated starting from React Native version 0.60+.
If your objective is to swipe images, we found another new plugin that swipes only images, and it complies with the latest React Native versions.
Keep Reading.
Applying the React Native Swipe Image Plugin
The react-native-swipe-image plugin is not that popular, but it swipes images flawlessly without any warnings or issues.

Your code should be something like the following snippet to test this plugin:
A few important things to note before using this plugin:
- The
imagesproperty expects a JSON array list of objects. Evert object should have two properties:urlandname. They must be named like that to let the plugin work. - You must implement both callbacks
swipeBottomandswipeTop; otherwise, the plugin shows an error. If you don’t need them, just try adding someconsole.log()statements, as shown above. - The
nameproperty values overlay on the image, as shown in the screenshot above.
If the above constraints do not comply with your requirements, you can try another more-popular plugin like react-native-gallery-swiper.
We recommend that you integrate your app with the React Native Gallery Swiper plugin as it supports more nice features like:
- It supports large lists flawlessly.
- It handles
onEndReachedevent, which indicates that the plugin's developer possibly built it on top of aFlatList. - Gesture controls, like pinch to zoom, taps and double taps.
- It includes a zoom mode to view a zoomed version of the image.
- And much more.
After all, Which Plugin Should you Use and Works Best for your Application?
Let’s take a look at the popularity of the plugins we used in this post first. We will measure the popularity of the weekly downloads of each plugin from npm.

On another note, react-native-swipeout for swiping components is more popular than react-native-swipe-list-view, although they declared that it’s deprecated. But, react-native-swipe-list-view is more popular than react-native-swipeable and is compatible with the latest React Native versions.
So despite the popularity of these plugins, we recommend that you use react-native-swipe-image for swiping images and use react-native-swipe-list-view for swiping components and swipe-to-delete functionality at the time of writing this post.
Conclusion
Swiping components in a React Native or any mobile application technology is necessary. It is an extensive functionality that is required by most of the use cases as it yields a better user experience reserving more screen space for other functionalities.
We recommend using both plugins mentioned in the previous section for swiping images and swiping components with swipe-to-delete; if you have another point of view, please, feel free to share by dropping us a comment.
Read Next
The following articles are related to react native swiper - the easiest unique 5 ways to start.